Recently, we released an Android app called Open, a location application built with open data using open source code. We made a number of library components for Open, which we will write about in the coming weeks. Today, we’re starting with a library called On The Road.
The purpose of this library is twofold: it’s a client for The Open Source Routing Machine (OSRM) and it handles some of the client-side challenges of routing, such as location snapping (map matching), distance calculations, and turn prompting. This post will cover location snapping which is why we started this library, then cover some of the library usages and some utilities in development to make it easy to develop it further (hopefully, with your contributions).
Location correction
GPS is an amazing technology, and it’s important to understand how it works and its limitations. Devices like smartphones have a chip that receives signals from GPS satellites, which transmit their position in space to the chip. When the GPS chip has this information from at least 3 satellites, it triangulates its own position on the planet. Kind of like this:
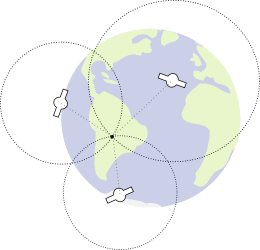
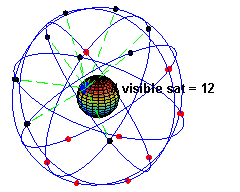
Although technically only 3 satellites are needed for positioning, the more satellites, the more precise the location. Repeated signals from the same set of satellites also have positive effects. If a GPS receiver is on the move and has to switch satellites, or only sees a limited number of them, the quality will suffer. This is very common in cities, where buildings will obstruct direct lines of sight to satellites, limiting the number of satellites to receive signals from and causing frequent switching. Here is a brief example of me walking around my block in Brooklyn.
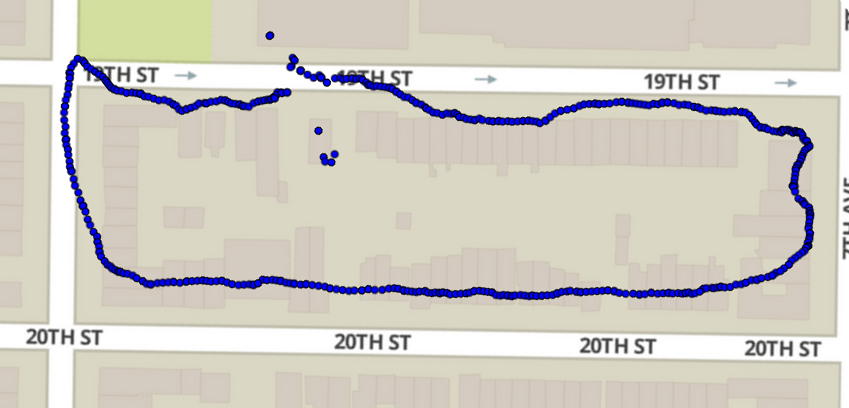
The results are even worse in Manhattan, where buildings are typically higher.
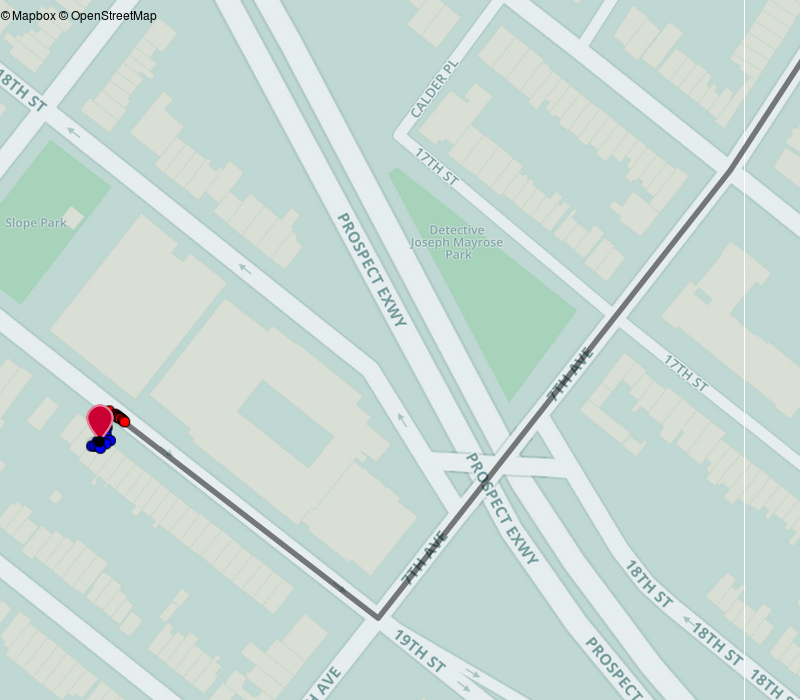
There are a couple of other things to consider when interpreting GPS. First, the accuracy has little to do with your location on the planet and more with how reliable subsequent readings are. On a map, the accuracy reading coming back from the Android location is represented as a circle with a radius of x meters, within which there is a 68% probability that the true location is contained.
During routing, for the location indicator to appear to be actually on the road it becomes necessary to correct GPS locations. The technique to accomplish this has been called map matching and is an active field of study in which various algorithms have been developed. This library takes a shortcut, since we have a polyline, the route, that we expect the user to follow. The more sophisticated algorithms will snap location onto a road network without a route, which is accomplished by taking various heuristics into account such as speed and direction.
Here is a simplified animation of how the location snapping works.

We maintain a reference to which segment of the polyline we are working with. We take the original location (Red dot) and find where it would intersect with the current segment (dashed line), this is done by taking 90 degrees off the azimuth (bearing) of the original segment. Once we have that we snap location to the route (Green dot). To see if we have traveled past the segment we measure the distance from the beginning of the segment and if it’s further than the segment distance we consider it to be on the next segment and do the same calculation to set the fixed location. The math formulas we use were translated from Chris Veness scripts. His examples are written in javascript and we translated them to java to use on Android.
How to use
Adding this to your app is simple, and documented in the repo. You can download the aar, and you have the option to include this in your maven or gradle build process, as On The Road is hosted on maven central.
By default the library is configured to use our OSRM instance but this can be changed. The primary class your code will interact with is the Router. You can get a singleton instance by calling Router.getRouter(). With that instance you can daisy chain options to it. For instance, to change the api endpoint call setEndpoint(String).
Router.getRouter().setEndpoint("http://example.com")With the router instance, options can be set for the next route.
router.setDriving() // Driving is default (setBiking, setWalking also available)A minimum of two locations are required to make up a route and the order of which they are passed in matters.
router.setLocation(new double[] {lat, lng})
    .setLocation(new double[] {lat, lng})
    .setLocation(new double[] {lat, lng});
Zoomlevel is used to determine the fidelity of the route polyline.
router.setZoomLevel(17) // defaults to 17When all options have been set a callback is attached to be used when the request to OSRM is completed.
router.setCallback(new Callback() {
    @Override
    public void success(Route route) {
        // do stuff
    }

    @Override
    public void failure(int statusCode) {
        // do stuff
    }
});
Finally, when it’s time to go execute fetch on the router and request will be made to the OSRM service.
router.fetch();The router is a singleton which means that when you want to execute another route you’ll need to clearLocations.
router.clearLocations();Assuming the request is successful and there are no errors to handle, the success method will be called with an instance of the Route class.
The route instance decodes the encoded polyline OSRM embeds the response and the getGeometry returns a list of node objects which is container for information for each vertex and the segment following it. These nodes can be used to draw the route on a map.
List<Node> nodes = route.getGeometry();To get a corrected location based on the original location call:
Location onTheRoad = route.snapToRoute(originalLocation);And to get a list of instructions:
List<Instructions> instructions = route.getRouteInstructions();There are number of other methods pertaining to distances and to which instruction the user is currently on:
route.getDistanceToNextInstruction();
route.getCurrentInstruction();
route.getRemainingDistanceToDestination()
These will give you real time information as location changes through snapToRoute method.
The instructions method has useful properties as well:
Instruction instruction = route.getRouteInstructions().get(0);
instruction.getTurnInstruction();
instruction.getHumanTurnInstruction();
instruction.getDistance();
instruction.getDirection();
instruction.getBearing();

//formatted instruction
instruction.getFullInstruction();
How to develop / contribute
Testing locations has historically been a painful process, but we have a couple of ways we have been exploring to improve the experience. Beyond unit testing, which is the easiest, we made our own location client that is in a library called Lost. We’ll be writing more about Lost in the coming weeks, but suffice it to say this library has lots of benefits for both usage and testing. For testing, you can essentially load up a gpx trace, replay locations, and then verify if your code is doing what it’s supposed to do. Another utility that we are working on is a web tester which one would run as developing to test. This is a work in progress, but here is an animation of how it works.
We welcome contributions and would love to have a dialogue about how this library can be generalized further beyond just what we needed for the Open app. Get in touch if you use any of the libraries, and help us make them better!
