Update: This post was written a while ago, and many of these instructions for setting up Pelias are out of date. Please see our new installation instructions, which are being actively updated.
For the past few months, Mapzen has been hard at work developing Pelias, a lightweight, modular implementation of a geocoder that’s easy for others to set up on top of their own datasets: everything from proprietary data bundles to OpenStreetMap planet dumps. Pelias is now fairly mature and approaching feature completeness, to the point that you can — wait for it — build your very own local instance. Here’s how. In this post, we’ll briefly take a look at the inner workings of geocoders in general, Pelias specifically, and then build Pelias on top of an OpenAddresses address dataset.
How it works
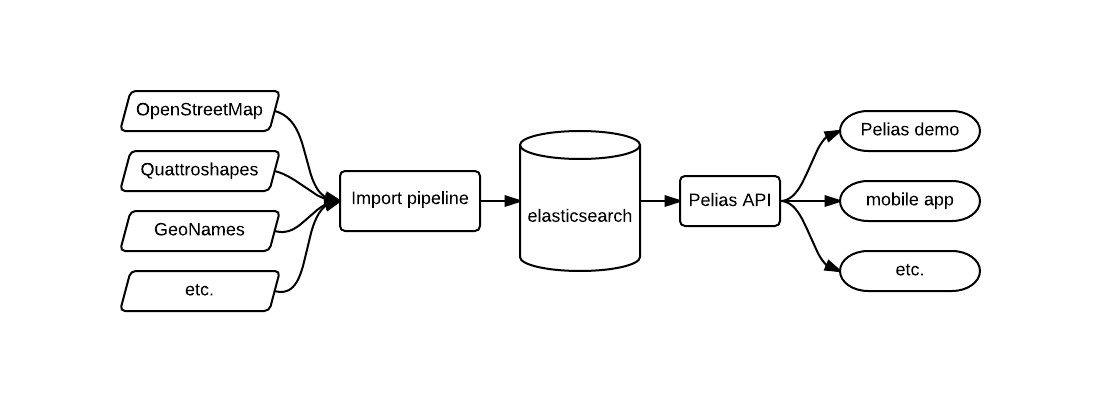
A geocoder consists of two fundamental components. The first is an API sitting on top of a database containing reams of geographic data, like records matching longitude and latitude points to textual names, that responds to requests and implements all kinds of search logic on top of what the underlying data-store already provides. The second component is the collection of data pipelines used to normalize, filter, and import geographic data into that database. Pelias relies on elasticsearch, an easily scalable database optimized for text search, and provides an API with three primary endpoints:
- reverse geocoding, or matching a name to a point
- search (forward geocoding), or matching a point to a name
- suggest, or query suggestion on the fly that tries to inference the text the user might want to search for
We’re developing import pipelines for numerous popular open datasets, described in detail below.
Existing importer
Pelias is dataset agnostic, meaning that it will work with any geographic data as long as it’s massaged into the proper format. Mapzen is actively developing importers for the following popular datasets:
- OpenStreetMap, a global address/street/region dataset
- OpenAddresses, a steadily growing aggregation of normalized municipal address datasets
- TIGER, a street survey of the United States published by the US Census Bureau
- GeoNames, a global point-of-interest dataset
- Quattroshapes, a global polygon dump at various levels of granularity.
Custom importer
Since the import pipeline is simply a collection of filters and mappers that accept any input data, it’s conceivable that you can write your own importer for any dataset. Our long term goal is to make that process as painless as possible to allow developers to adapt Pelias to their custom datasets. It’s currently a fairly complex piece of machinery overall that might, at any given point, perform anything from filtration to address de-duplication, and is being constantly refined and improved (we’re working on it, and we welcome pull requests!). For this post, we’ll use the dataset-specific importers listed above.
Setting up your own
Pelias has lots of moving parts, but most of the installation and dataset-import process has been abstracted away into a convenient Vagrant image that we’ll use in this post. It’ll build a virtual machine, install and run elasticsearch, the Pelias API, all other minor dependencies, tweak various environment settings, and can optionally import certain datasets for you right out of the box.
Installation
Pelias ships with a Vagrant image that will create a virtual machine (essentially an operating system running inside another operating system) independent of your host computer, and install Pelias in a complete sandbox. That means we can rely on identical working environments, exact library/package versions, and the presence of all necessary dependencies. The image contains exhaustive documentation of all its configurable bells and whistles, but here are the basics. Note that we recommend a box with ~4GB RAM and ~20GB of free disk space, and realize that the documentation will be up to date. This article will not. If something is consistently going wrong, check out the docs to ensure that no new dependencies, requirements, or steps were introduced.
Vagrant dependencies
The only dependencies that you’ll have to install are those of Vagrant itself. If you’re on Ubuntu or a similar Linux distribution, your package manager should suffice for two of the three: apt-get install virtualbox vagrant; if not, install them manually from VirtualBox and Vagrant. Lastly, install ChefDK.
Building the image
Update: This post was written a while ago, and many of these instructions for setting up Pelias are out of date. Please see our new installation instructions, which are being actively updated.
Once you’ve successfully installed the above dependencies:
git clone https://github.com/pelias/vagrant
cd vagrant
vagrant plugin install vagrant-berkshelf
vagrant plugin install vagrant-omnibus
You’re now ready to begin building the image, but first we’ll need to configure the datasets so that it automagically imports once everything’s set up. Create a new file called pelias_settings.rb in the root of the Vagrant repo (should be your current directory), and add the following:
Vagrant.configure('2') do |config|
  config.vm.provision :chef_solo do |chef|
    chef.cookbooks_path = 'cookbooks'

    chef.json = {
      'pelias' => {
        'schema' => {
          'create_index' => true
        },
        'osm' => {
          'index_data' => true,
          'extracts' => {
            'new-york' => 'https://s3.amazonaws.com/metro-extracts.mapzen.com/new-york_new-york.osm.pbf'
          }
        }
      }
    }

    chef.run_list = [
      'recipe[pelias::default]'
    ]
  end
end
This configuration file, based closely on this more complete version, will instruct Vagrant to perform certain actions while building (like 'create_index' => true, which creates the Pelias elasticsearch index), and optionally import some datasets — in this case, the OpenStreetMap data for New York. You can change the link to any other OSM PBF, like the ones we provide for numerous other cities as metro extracts, or forgo that import entirely by setting 'index_data' to false, like so:
'osm' => {
  'index_data' => false,
  'extracts' => {
    'new-york'      => 'https://s3.amazonaws.com/metro-extracts.mapzen.com/new-york_new-york.osm.pbf'
  }
}
Since we’re only importing OpenAddresses data, we’re going to skip any OSM imports for now.
Finally, the one command to rule them all: PELIAS_VAGRANT_CFG="$(pwd)/pelias_settings.rb" vagrant up. Make sure that you have a stable Internet connection before running it because the bootstrapping process will download a lot of software.
Go grab a coffee, since this will take anywhere between 10 and 20 minutes. The generous logging will make it obvious if something breaks along the way, in which case you should simply try running it again (I know, but trust me). Errors related to timed-out requests are often the results of a slow network or unresponsive servers, in which case you should wait a bit before pulling the trigger. If you’re still experiencing problems, raise an issue.
Once the build completes, give the output a cursory glance to ensure that there weren’t any (non-fatal) errors along the way. First, as a sanity check, run curl localhost:3100 and expect to see {"name":"pelias-api","version":{"number":"0.0.0"}}. Then run vagrant ssh, and you’ll find yourself inside the Pelias box.
Importing a dataset
Now, we’ll import a small OpenAddresses dataset. Start by downloading the OpenAddresses bundle to the Vagrant box (this means you still need to be ssh’d in), which consists of a large number of CSV files containing addresses for entire countries, states, and cities at a time.
wget http://s3.amazonaws.com/openaddresses/openaddresses-processed.zip
mkdir openaddresses-data
unzip -d openaddresses-data openaddresses-processed.zip
mkdir my_dataset
cp openaddresses-data/us-ny-nyc.csv my_dataset
The newly created my_dataset directory will contain all of the OpenAddresses files we’ll import into Pelias; us-ny-nyc.csv (New York City) was chosen to get you started, but feel free to use any other file or copy more of them into the directory. Then, install the OpenAddresses importer:
git clone https://github.com/pelias/openaddresses
cd openaddresses
npm install
node import.js ../my_dataset
The last command will kick off the import, so sit back and watch the stats scroll by. (You can get another cup of coffee if you feel like it.) You should see something like the following:
{
  "start": 1421159940127,
  "paused": false,
  "transient": 0,
  "current_length": 154,
  "end": 1421159956764,
  "indexed": 500,
  "batch_ok": 1,
  "batch_retries": 0,
  "failed_records": 0,
  "openaddresses": 500,
  "persec": 0
}
Pay attention to the indexed value: this is the number of documents successfully indexed in elasticsearch.
See it on a map
An API on its own is all well and good, but most users will want to use it in conjunction with something like…a map! Our demo provides just that, and, for convenience, we provide a version that ties into the Pelias that you have running locally: check it out. It’ll query localhost:3100, or the API running inside your Vagrant image, meaning that you can scroll over to whichever geographic area you imported and poke around. Happy geocoding!
