In the fourth post in our Engineering at Mapzen series, we dig into API management and rate limiting using ApiAxle with a demo in Docker.
Don’t let your APIs manage you
Say you need to manage access to an API. Direct access to the underlying system usually needs to be restricted, and you may want to meter and measure usage for a particular group of users identified by an API token. We do this using ApiAxle, an open source proxy tool, and wanted to share what we learned. But we’re not just going to throw words at you – this post doubles as a working tutorial that you can follow along with using Docker. We talk more about why we chose ApiAxle at the end of this post.
Terminology
For the sake of clarity, let’s get some of the terminology out of the way:
API (application program interface) is a set of routines, protocols, and tools for building software applications. In our context they allow developers to use search, turn-by-turn and vector tiles in their applications.
A proxy is a software layer that runs between a client and the service origin.
Here’s the software we will use in the demo:
ApiAxle is a proxy that sits on your network, in front of your API(s) and manages things that you shouldn’t have to, like rate limiting, authentication and analytics. It’s fast, open and easy to configure.
Docker is a technology that manages LXC (Linux containers). This Linux kernel technology creates lightweight virtualized OS environments using cgroups and namespaces rather than emulating the hardware layer. This allows you to create many of them without it being a drag on the host system.
Docker compose is software for defining and running multicontainer Docker applications. With it, you use a
docker-composefile to configure your application’s tasks. Then, using a single command, you can create and start all the tasks from the configuration file.Docker Hub is a cloud-hosted service from Docker that provides registry capabilities for public and private content and supports collaboration. (Think of it as GitHub for Docker images.)
Redis is an open-source, in-memory data structure store, used as database, cache and message broker.
Node.js is an open-source, cross-platform runtime environment for developing server-side web applications using JavaScript.
nginx is a popular open-source web server.
Now for the exciting bit…
If you are unfamiliar with Docker, it is a very exciting way of working with complex multihost distributed systems on your local development environment. It is ideal for this kind of demonstration, though it might be frustrating if you haven’t worked with it before. But you can do it! Installation instructions are here.
The material was made and tested with the following versions of docker and docker-compose:
  ➜  ~ docker -v
  Docker version 1.8.2, build 0a8c2e3
  ➜  ~ docker-compose -v
  docker-compose version: 1.4.2
If you like to follow along… (and my apologies in advance for using a Git submodule – I just don’t dislike them as much as many developers do.)
  git clone --recursive git@github.com:mapzen/docker-apiaxle-demo.git
  cd docker-apiaxle-demo
This repository has some content in the readme but these will be more step-by-step instructions, annotated with pictures.
Once you have the code take a look at the docker-compose.yml file. This lists all the nodes in the system that you’ll boot up on your machine. This includes Redis, API (for managing ApiAxle), web-proxy (NGINX frontend for the proxy), proxy (ApiAxle), proxy-event-subscriber (ApiAxle’s way of subscribing to Redis events for stats), fake-services (two APIs we’re going to manage with ApiAxle). This might be a lot to take at once but it will make sense towards the end.
To get started we have to build and run the images locally. There is one image that I hosted on Docker Hub, which will save you from building it on your own. You can find the Dockerfile for it here.
  docker-compose build
  docker-compose up
If everything goes according to the plan you should see a streaming stdout from all the services defined in the docker-compose.yml file. Now we’re finally ready to get started.
The following illustrations show the setup for this tutorial. While this example bundles everything in a single setup, in reality there are two steps: in addition to the administrative API, there would be an admin app which would never be publicly exposed and would reside behind a different frontend.
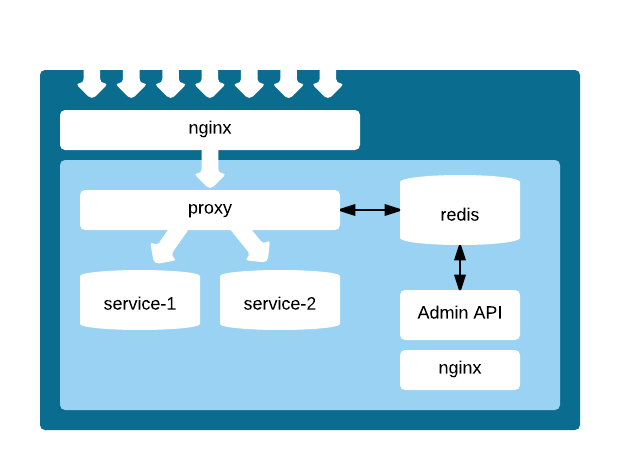
The top part of the diagram shows the API proxy where the users are routed through to the right service. This setup is a vanilla NGINX setup that listens for configured domain names.
server {
  listen 80;
  server_name service-1;
  location / {
    proxy_pass http://cluster;
    proxy_set_header Host "service-1.api.localhost";
  }
}
This will also set the host header for the ApiAxle proxy software so that it knows how to dispatch it. The proxy software expects the hostname to have “.api.” appended to it. The name is used for lookup and you can add a suffix such as localhost to indicate that it’s running locally.
Before we start you need to add the following into your /etc/hosts file … if you’re on a Mac you’ll need to switch 127.0.0.1 with the value of the Docker host on your system.
127.0.0.1 apiaxle-api service-1 service-2
For this to work the API needs to be registered with ApiAxle. This can be done in two ways – one is through the API:
curl -H 'content-type: application/json' \
  -X POST \
    -d '{"endPoint":"fake-services:8001"}' \
      'http://apiaxle-api/v1/api/service-1'
{
    "meta": {
        "status_code": 200,
        "version": 1
    },
    "results": {
        "allowKeylessUse": false,
        "corsEnabled": false,
        "disabled": false,
        "endPoint": "fake-services:8001",
        "endPointTimeout": 2,
        "keylessQpd": 172800,
        "keylessQps": 2,
        ...
    }
}
API for the ApiAxle
With the API we can perform basic CRUD operations on the projects and also mint API keys for projects, link them to projects, and set limits on those keys. The API is documented here.
Frontend to work with the API for ApiAxle
The frontend is a very simple tool we cobbled together as we were learning the API for ApiAxle. This will allow you to read project stats and see them as you start using it. (It will not do any key minting or linking – to do that we’ll follow the readme instructions on the project.)
Now let’s go step by step
Fire up the environment
docker-compose build
docker-compose up
Curl into the API (we’ll only use the API here, not the web admin)
curl apiaxle-api/v1/apis
If your response is…
{
    "meta": {
        "pagination": {
            "next": {},
            "prev": {}
        },
        "status_code": 200,
        "version": 1
    },
    "results": []
}
…that means we’re ready to move on to the next steps.
Try hitting the the service-1 or service-2 endpoints:
curl service-1
And you’ll get ApiUnknown error back:
{
    "meta": {
        "status_code": 404,
        "version": 1
    },
    "results": {
        "error": {
            "message": "'service-1' is not known to us.",
            "type": "ApiUnknown"
        }
    }
}
This just means that we haven’t created an API. Let’s create both service-1 and service-2 in slightly different ways.
For the first one we’ll allow what is called a keyless access, where no key is required to access the service. Under the hood a temporary key is created based on the IP address. Note that rate limiting is based on it.
curl -H 'content-type: application/json' \
  -X POST \
    -d '{"endPoint":"fake-services:8001", "allowKeylessUse": true}' \
      'http://apiaxle-api/v1/api/service-1'
Now if you try to access the service-1,
curl -v service-1

....

X-ApiaxleProxy-Qps-Left: 1
X-ApiaxleProxy-Qpd-Left: 172798
you’ll see that the ApiAxle will return headers that indicate the remaining limits on your service. Note that this does not require a key.
Now let’s do the same for service-2, but require a key for its use.
curl -H 'content-type: application/json' \
  -X POST \
    -d '{"endPoint":"fake-services:8002", "allowKeylessUse": false}' \
      'http://apiaxle-api/v1/api/service-2'
if you try to access this API now you’ll get 403 Forbidden.
curl -v service-2

  ...

{
    "meta": {
        "status_code": 403,
        "version": 1
    },
    "results": {
        "error": {
            "message": "No api_key specified.",
            "type": "KeyError"
        }
    }
}
We can address this by creating a key:
curl -H 'content-type: application/json' \
  -X POST \
    -d '{}' \
      'http://apiaxle-api/v1/key/something-special'

...

{
    "meta": {
        "status_code": 200,
        "version": 1
    },
    "results": {
        "createdAt": 1457984190955,
        "disabled": false,
        "qpd": 172800,
        "qps": 2
    }
}
And then we link to the service-2 API:
curl -H 'content-type: application/json' \
  -X PUT \
    'http://localhost/v1/api/service-2/linkkey/something-special'
Now we can call the service-2 API:
curl -v 'service-2?api_key=something-special'
...
X-ApiaxleProxy-Qps-Left: 1
X-ApiaxleProxy-Qpd-Left: 172799
And now if we create yet another key with very low limits, we can see what the response is when key limits are exceeded.
curl -H 'content-type: application/json' \
  -X POST \
    -d '{"qpd": 1}' \
      'http://apiaxle-api/v1/key/almost-no-requests-per-day'

curl -H 'content-type: application/json' \
  -X PUT \
    'http://localhost/v1/api/service-2/linkkey/almost-no-requests-per-day'
We only need to fire off two calls to service-2 and we should see the limit hit.
curl -v 'service-2?api_key=almost-no-requests-per-day'
...
X-ApiaxleProxy-Qpd-Left: 0

curl -v 'service-2?api_key=almost-no-requests-per-day'

...
HTTP/1.1 429 Too Many Requests

{
    "meta": {
        "status_code": 429,
        "version": 1
    },
    "results": {
        "error": {
            "message": "Queries per day exceeded: Queries exceeded (1 allowed).",
            "type": "QpdExceededError"
        }
    }
}
Where to go from here
Now that you have this infrastructure setup, all that is left is to integrate with your user management system to manage these APIs and access to them. ApiAxle is very flexible and will even do some statistics analytics for you, which we’ll cover in a future post. As a sneak peak you can navigate to http://apiaxle-api/#/apis/service-2.
Although we used docker in this post to demonstrate basic flows, please note that we don’t use these docker images in production. For production setup that is battle-tested please refer to our chef cookbook for ApiAxle.
Why we chose ApiAxle over other API management options
When should you deploy something in-stack versus using a hosted 3rd party service for API management? Flexibility and control were our primary criteria, so we were quite pleased when we discovered ApiAxle on via stackoverflow.
As your organization decides how to manage their APIs, you should investigate all the options, including hosted 3rd party services such as 3scale and the new Amazon API Gateway service.
Running your own system comes with one minor disadvantage compared to third-party hosted services – it does not run on the edge. In our case, we don’t need to rate-limit our users for responses we’ve already computed and are served from our edge caches. However, we still measure the usage so we can get a clear picture of what is happening on our APIs.
One thing that should be called out about ApiAxle is that it doesn’t apear to be actively maintained, though we’ve had great success with it in the past year and things have been stable. We’ve made a couple of adjustments and are in the process of preparing changes to be merged upstream. One is for stats batching and XHR headers configurations. Analytics is the biggest area where ApiAxle could be improved. We plan on building more functionality into the product over the next few months, which will be the topic of a upcoming Engineering at Mapzen blog post.
Conclusion
We’ve successfully used ApiAxle for over a year and haven’t had any problems to speak of. It’s stable and gives you great flexibility to manage and craft your services as you choose. ApiAxle focuses on solving a specific problem well and leaves it up to you to implement other requirements like user management.
Let me know if you have any questions on the demo, or on our use of ApiAxle!
